Why Digital Ocean?
Read Part I where we deployed Parse Server on Heroku and didn’t like the development flow at all; that’s why we selected DigitalOcean as the host service for our Parse servers.
These two services work with different layers of backend infrastructure; Heroku abstracts you away from the ‘bare metal’ giving you configured and ready-to-use dynos, which is convenient at first glance, but can become problematic when your requirements grow or change. On the other hand, DO provides you with a clean Unix box which can be configured in any way you like. The configuration process is harder, it takes more effort, but gives you more flexibility.
Special thanks to my colleagues Nikolay and Evgeniy for their hard work on Parse server migrations.
Let’s look into some examples:
Parse Server setup. With Heroku it’s simple, you just grab Parse Server buildpack from github and deploy it on the Dyno with pre-installed node.js. On DO you have to set up everything from scratch: node.js, all the packages, database, Parse Server and Parse Dashboard. It looks like Heroku does a lot of stuff for you, but what about installing and updating third party node packages, running Parse Server with node-debug to profile code, integrating monitoring and so on. While you are using the default setup, it’s easier on Heroku, but once you try to go a step further, you start to spend an enormous amount of time fighting with the infrastructure.
Service reuse. Building Parse Server and its dependencies inside Docker containers allows you to use the same containers on different installations, which is very handy in case you have more than one backend. On Heroku you can’t install anything custom: you should use a 3rd party provider like MLab for your MongoDB, which is a perfect choice unless you want to configure it and reuse this configuration between backends.
Our goal was to trade in ease of use and setup for greater control and flexibility.
Engineering team
Yes, this requires more administrative work, writing tools for deploy on your own, etc., but the good thing is that we no longer have to treat DO as a dependency anymore: if it is acquired by Google and shut down, we’ll deploy our backend on any other VPS and users will not even notice this.
Parse is shutting down on January 30, 2017 and you might need help migrating your apps. We can help with that, let’s talk!
Our infrastructure
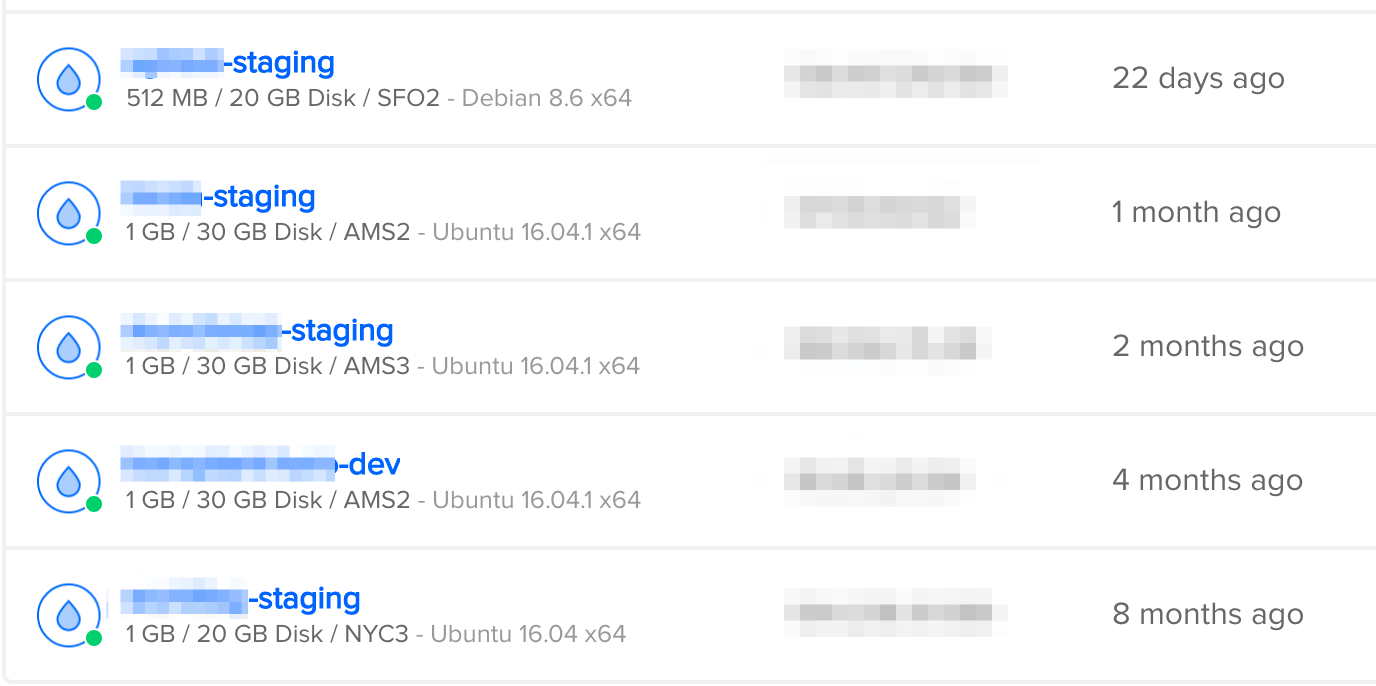
We prefer to separate DO instances for each server. We use different instances for staging and production servers. Most staging servers are deployed on $10 droplets, that contain 1GB RAM and 30GB SSD.
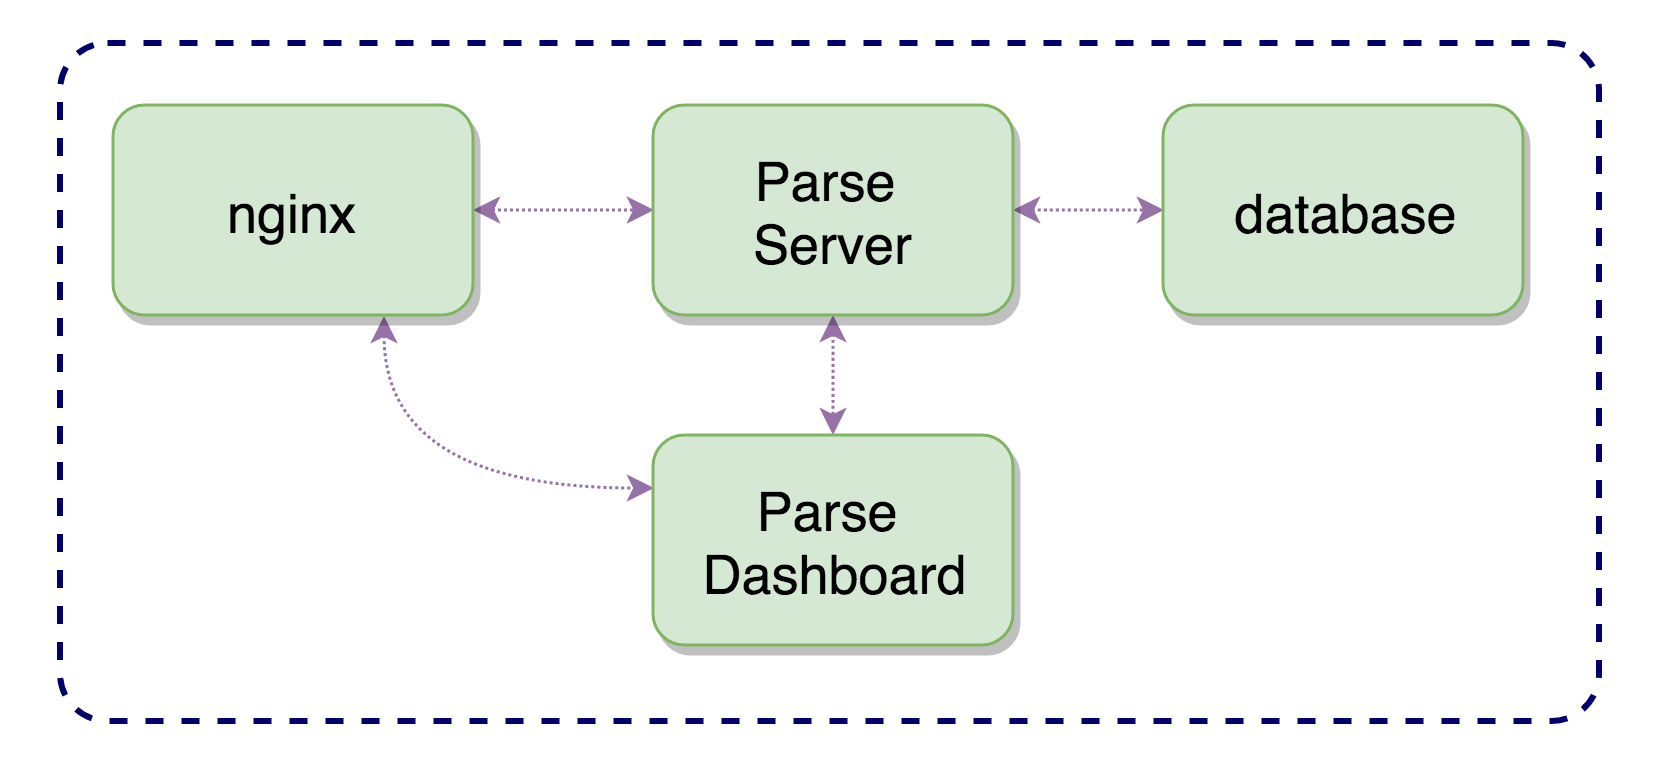
We build every Parse-compatible server on docker containers. We use Parse Server, Parse Dashboard, Database and nginx wrapped into docker containers, as described in the picture below.
While we are developing, our app is linked to the local environment (dev server), deployed on the developer’s computer. This makes it easy to test Cloud Code changes without disturbing other developers and without altering data on the staging server. When the code is tested, we push it to the develop branch; dev application is linked to the staging server.
Of course, developing new features should not affect real users, so we link our AppStore apps to the safe&stable production servers.
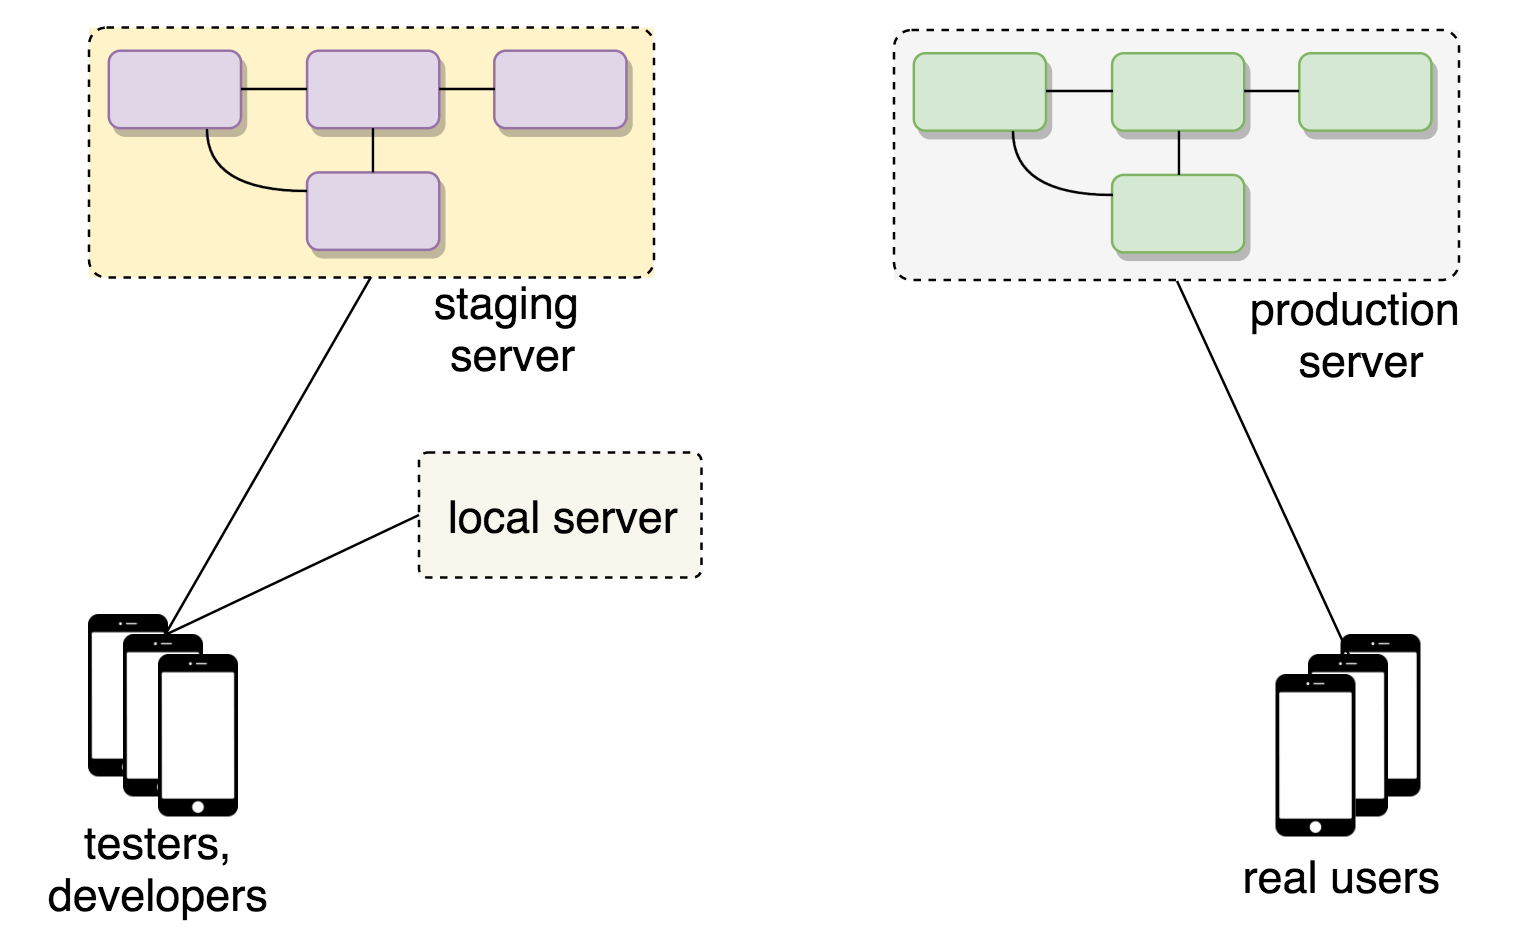
Each server is a separate DO instance, because production servers usually require more RAM and disk space, than staging servers.
The limitations we faced using Parse
Some of the backend decisions we made may look weird, however we made them on the basis of existing infrastructure. We were constantly facing some Parse limitations and trying to solve them for our servers on DO. Our idea was not to re-create the whole backend from scratch, but to create an “infrastructure nest” into which we can put any existing Parse Server application and it will work as normal.
Database access
As you know, developers didn’t have direct access to the database of their Parse.com application: they could see data only through the web-dashboard. Also, it was unclear what exact database was underlying the project (DB version and storage engine), and there was an mysterious, inaccessible abstraction layer – middleware – that was not part of the standard Parse library.
While we were developing a server side code, we took into consideration the following restrictions:
- Number of requests per minute (a lot of business logic was written keeping in mind the need to reduce the number of requests to the database).
- Limited database size (database size was limited by the number of records and disk volume).
- The inability to read from the database and send to the app-only fields, particularly needed for this specific request. Parse server SDK and mobile SDK are pieces of the same core library, which speeds up the development but imposes some restrictions. The database collections match objects inside the app because there’s a connection between them; of course, you can send the usual JSON from a server and parse it on the client side, but it will take extra developers’ time.
Database indexes
Due to database inaccessibility it was not possible to affect the database indexes at all: developers could not create, update or remove indexes for their Parse applications. After migration we needed to take care of indexes ourselves. We created a script to add indexes in a more convenient way.
Limited logs
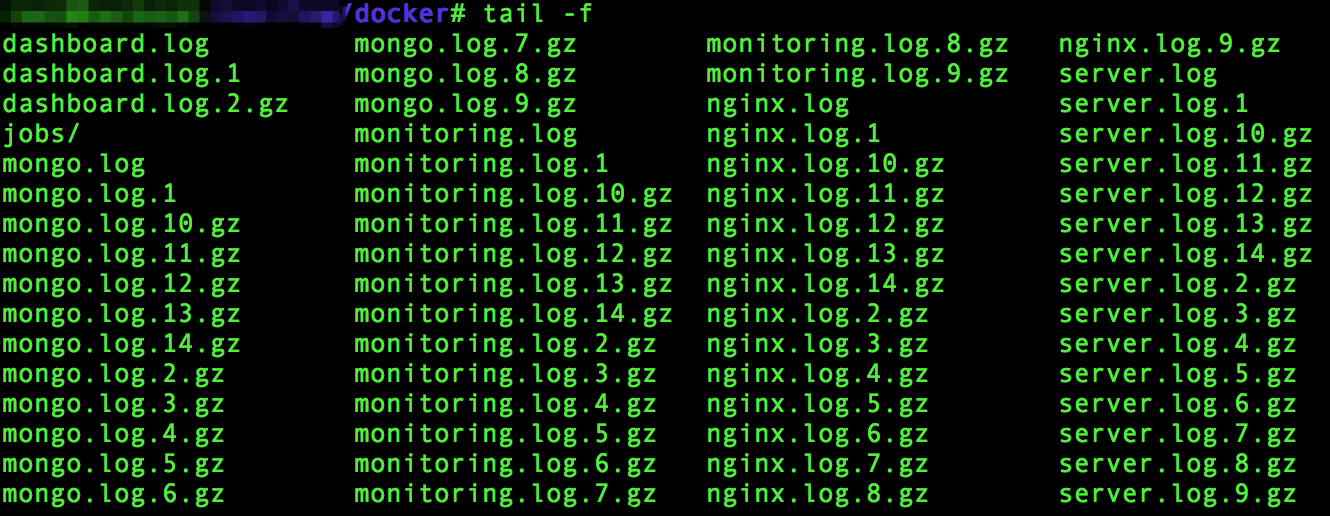
Parse Dashboard shows only N last log entries. Unfortunately, those logs were not very useful if you wanted to understand the problems of a particular user: you can’t find logs for yesterday, you can’t group them, etc. Fortunately, if you have your own server, you can build a more complicated log system. We store logs in the separate files for every component (server, dashboard, nginx, jobs), we enable logrotate for those files, and we can push logs to the logs aggregation services (like ELK) to see the whole picture at once.
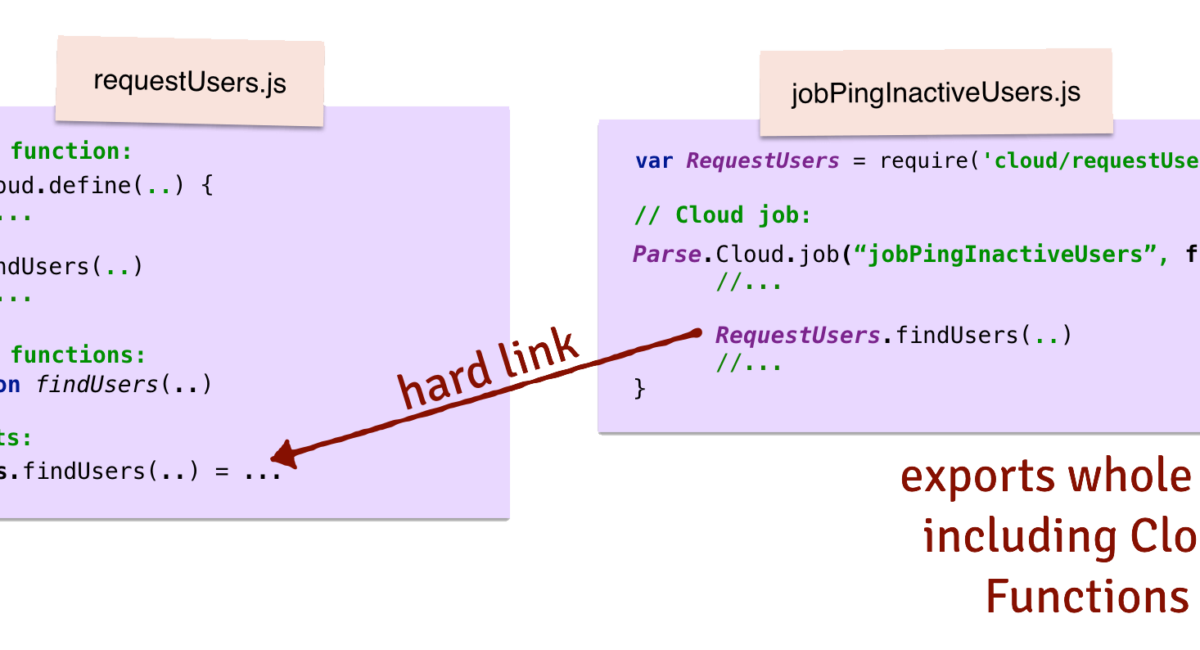
Cloud Jobs
If you work with Parse, you may be familiar with problems migrating Cloud Jobs. We used crontab as a “fast and working” solution for the first stage. Unfortunately, using crontab ruins encapsulation principles: crontab is part of OS itself, not part of the Parse Server container. We’re going to migrate to javascript schedule libraries instead.
Parse itself is the service that allows you to deploy working minimum viable products fast, but you don’t have much flexibility to make your products more complex.
Migration details
Our plan
Ready? Steady? Go!
- Refactor Cloud Code to be compatible with Parse Server (read this post if you want to know more).
- Register production Digital Ocean account.
- Register domain name.
- Register SSL certificate (it’s better to register a wildcard certificate, which will allow you to use the same domain name with different subdomains).
- Set up Digital Ocean droplet (select pricing plan / server capacities).
- Install & run Parse Server.
- Install MongoDB with secure connection (enable SSL).
- Install & run Parse Dashboard (enable authentication).
- Deploy cloud code (and pray).
- Create Amazon S3 bucket and link Parse Server to it (set up file storage for PFFiles).
- Set up & enable APNS certificates (push notifications should work).
- Configure custom logger (we used Winston).
- Configure logrotate for log files.
- Schedule (cron) Cloud jobs.
- Migrate production database (partially, for testing).
- Create database indexes.
- Check app/server performance (pay attention to response time).
- Check backward compatibility (users should be able to update their old app, which is linked to Parse.com, to the new app, linked to your new server, without any problems or missing data).
- Turn on permanent migration for Parse database. Submit application to the Store.
- Monitor all the things! Pay attention to server behavior, response time and error rate.
Parse Server Ansible Playbook
We migrated many projects from Parse.com and doing it manually means doing many things again and again. Of course, it’s better to automate everything. We created an ansible playbook for all recurrent tasks. The basic idea is that you don’t need to login on the server via ssh every time you want to deploy new code or restart the server. Just run one script command from your local machine and enjoy.
We use the script to automate steps 6-16, basically, everything that deals with infrastructure and services setup. Please, check our Parse Server Ansible Playbook repo if you want to know more.
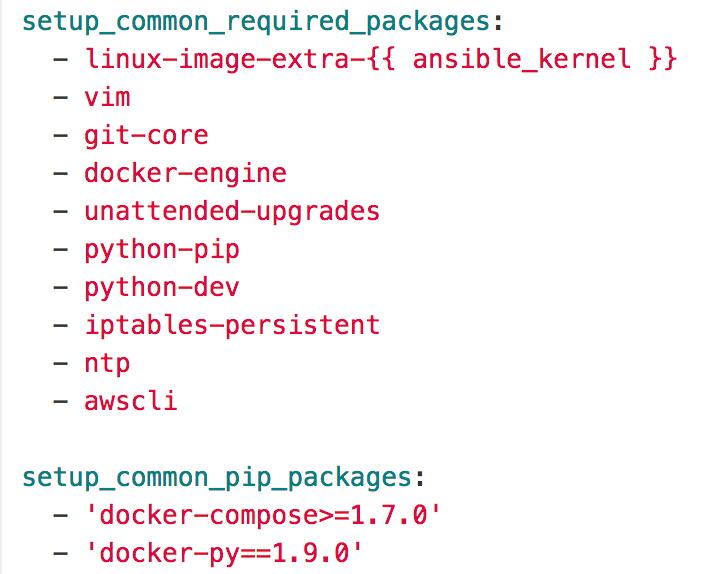
Script describes basic packages that should be installed, configures Parse Server, Database and Dashboard, sets up logs and allows the developer to schedule Cloud jobs.
file is the key for server configuration. We splitted configurations into base, staging and production. Using and you can easily customize server environments.
Packages configuration (aka NPM all the things!)
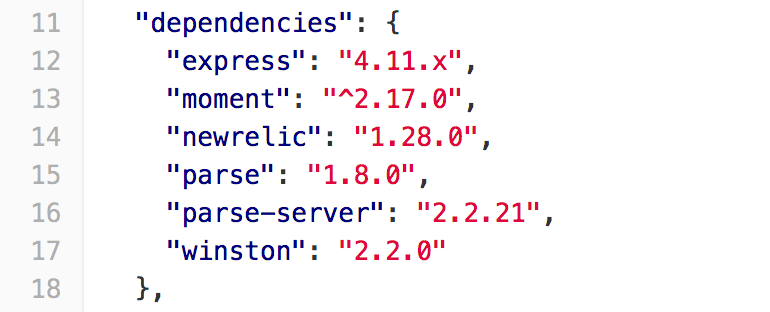
The real inconvenience of writing Cloud Code on Parse.com was handling third party dependencies. For example, moment.js is a handy library that helps with managing dates and time zones. We needed to add the library as source code to our Parse.com Cloud Code.
Fortunately, running your backend means that you can use npm for handling dependencies. Our script uses package.json to install the required packages:
Development process
How did our development process look while our backends were on Parse.com? Write some server code, run to commit changes to the server, read logs in terminal. If several developers were working on the server code at the same time, they often wrote over each other’s changes.
Hopefully, working with your own server is more pleasant. Developers deploy the server on their local environment (virtual machine), migrate the database and test the server code changes locally, before committing to the staging server. Dev application is linked to the staging server that allows you to test the whole committed code.
MongoDB indexes problems
Parse.com handled creating indexes for you, but now it’s your own responsibility. Fortunately, when you have direct access to the database, you can create and re-create indexes when it’s needed.
Making indexes is not very complicated. We analyzed requests and to understand how data is read from the database and what fields should be indexed.
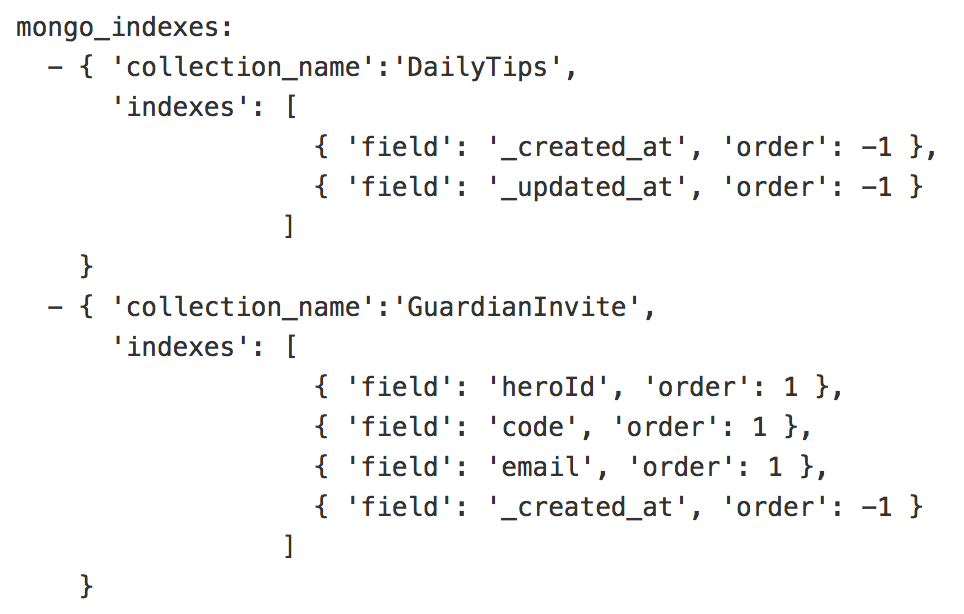
Our script allows you to describe collections, index fields and index order. Then you only need to run one command to deploy these indexes to the server.
Backups
Of course, backups are important. We use different levels of backups:
- Native Digital Ocean backups of the whole droplet. It costs an extra 20% on top of the current droplet cost, but backs up the whole server image.
- Nightly database backups to the Amazon S3 bucket. A zipped database doesn’t take up a lot of space, so these backups are rather cheap. Nightly backups are scheduled as cron task.
- Backup-on-demand. We created a script command to make a backup whenever it’s needed.
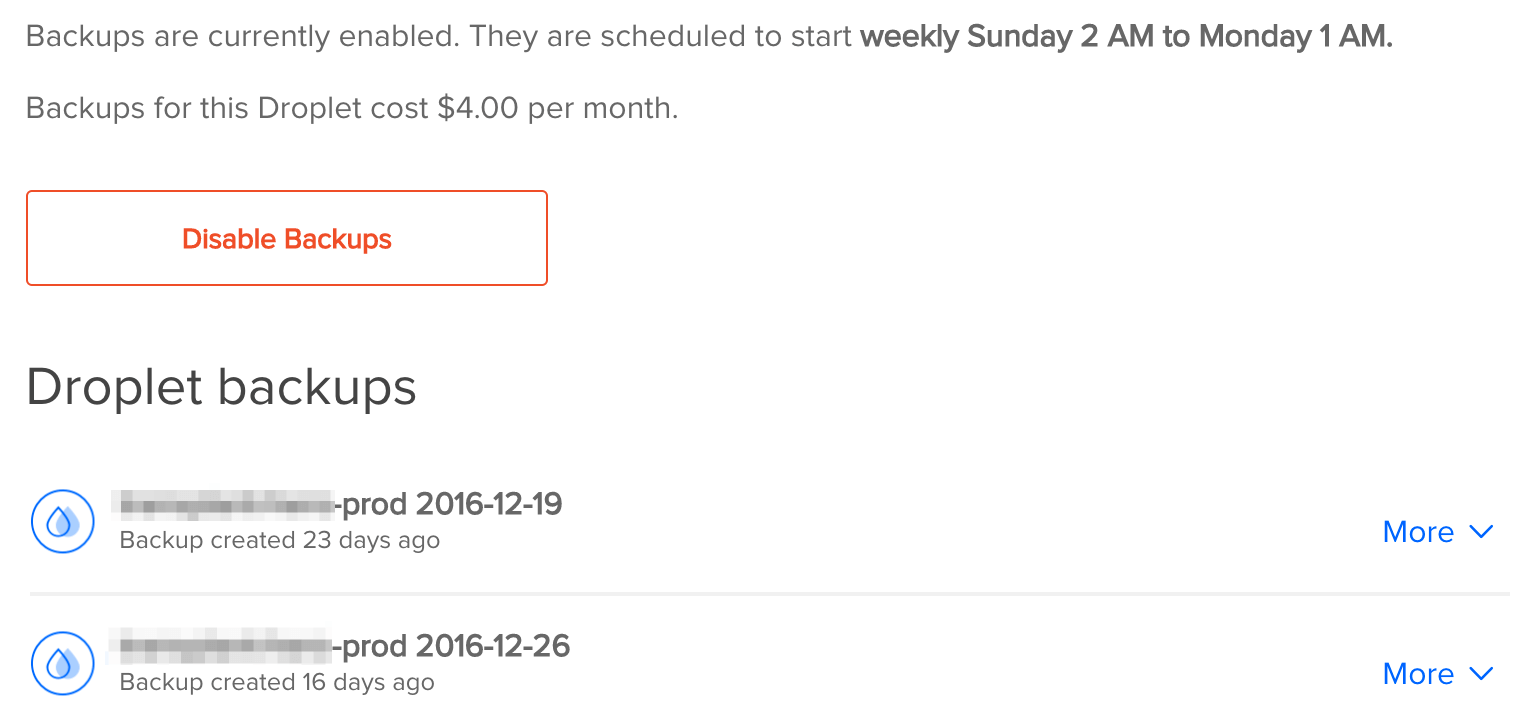
We believe that the most important thing to back up is the database. The server configuration is stored in config files, so it’s easy to set the server up on the new droplet and recover the database from backup.
Jobs
Using crontab to schedule jobs is not the greatest idea (as explained above), but it’s easy and fast.
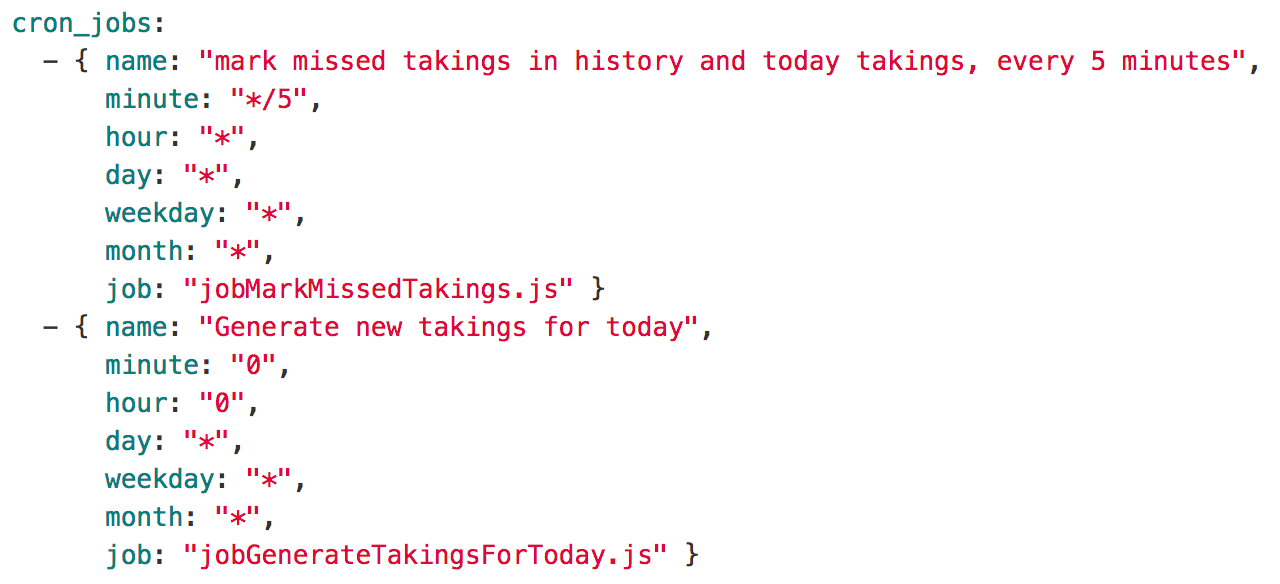
Of course, we created a configuration file for jobs too. It describes what job file to run and when to run it using crontab syntax. As always, you just need to run one script command to schedule crontab jobs. We use a crontab of parse user, not root one, for security reasons.

But be careful with crontab setup: it’s easy to make a typo and schedule a file every minute, instead of every hour.
Sooner or later we will migrate from crontab to the javascript schedule library.
Monitoring Parse Servers
It’s obvious, that developers need to understand what’s going on the server. We built a multi-layered monitoring system for Parse servers.
Watchdog
This is not really monitoring, but rather a tool to prevent long outages. We were faced with a situation when the Parse Server process crashed due to a TimeOut exception (the server was trying to send a push notification, but the APNS gateway was unreachable). Unfortunately, users immediately saw a “Server unavailable” error on their screens. To prevent this situation from happening again, we enabled a watchdog that runs Parse Server if it suddenly stops.
Uptime Robot
UptimeRobot pings the provided URL and checks whether it’s working. We use pinging to monitor whether the whole system is working correctly. The function makes a request to the User table to get the first User object and returns the current timestamp, then we test the whole chain: server – nginx – Parse Server – database — is on and running.
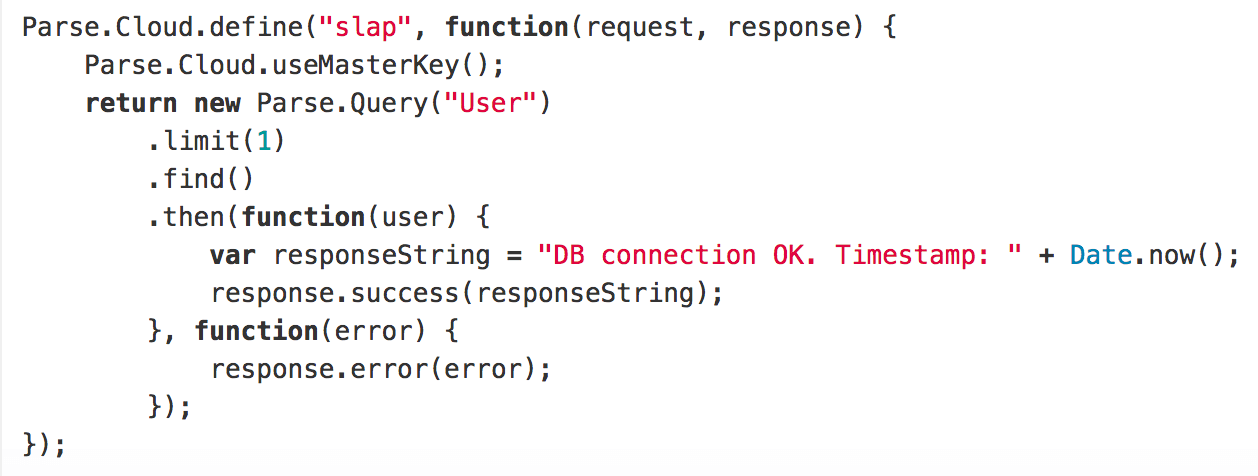
We created Slack and email integrations for UptimeRobot: it sends notifications if the server is down.
NewRelic
NewRelic is a well-known monitoring service. We use it in two areas: to monitor web response time (how long it takes for the server to respond) and hardware (CPU, memory, storage amounts).
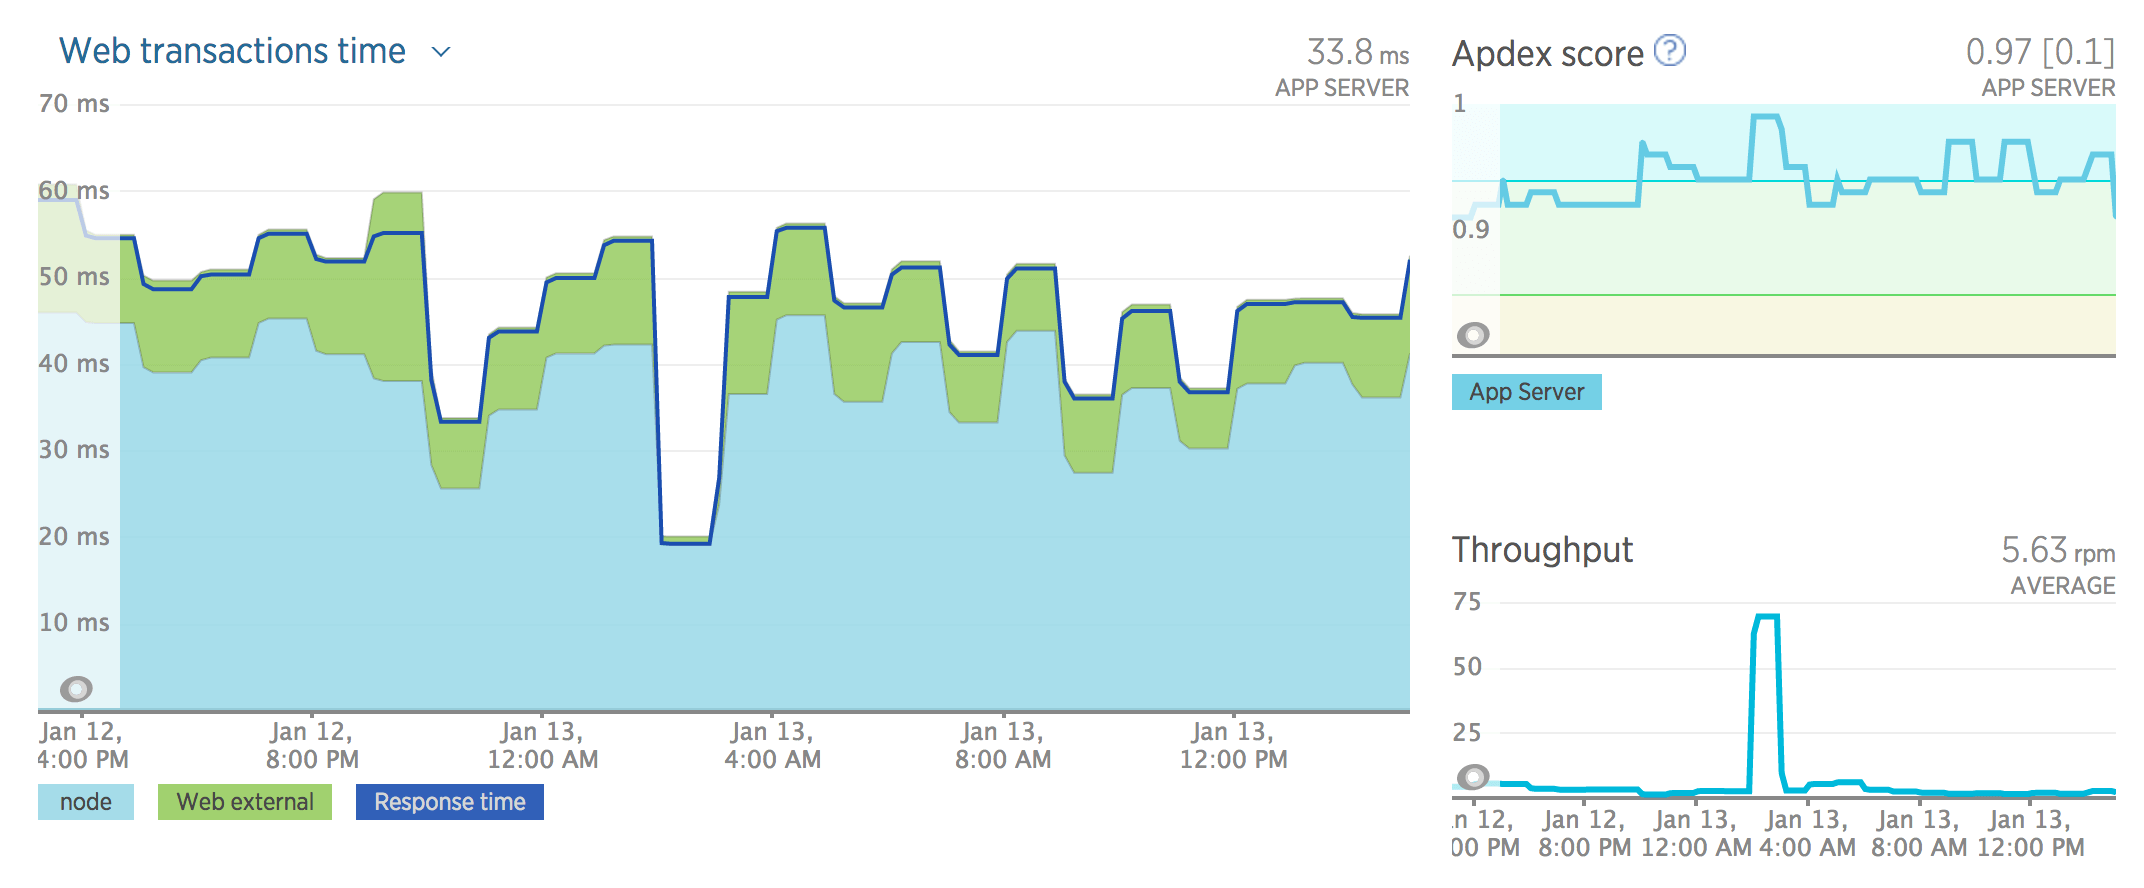
Of course, NewRelic is famous for its alerts system: it sends alerts when response time increases or when the server is running out of free memory.
Setting up monitoring services is very important, but reacting to their warnings is even more important 🙂
Other things to bear in mind
Infrastructure
- Don’t forget to register SSL certificates for each server. We prefer using wildcard certificates, because this allows us to use the same certificate configuration for staging and production environments.
- It’s not easy to change ownership of the Digital Ocean droplets. You need to create a snapshot and transfer it to another account and, of course, the new droplet will have a new IP address, which requires you to change the DNS configuration. Be careful when creating production droplets: it’s better to do it on the correct account first time 🙂
- DigitalOcean is rather cheap; prices starts from $5. But a $5-droplet is good for teaching yourself unix, nothing else. Trying to connect and run two commands side by side is almost impossible. Besides, the Parse Server process and Docker containers use 80% of available RAM. That’s why we build staging servers on $10+ droplets.
Weird issues with Parse Server
Parse Server is an open source and community-driven product, that does not replicate parse.com behavior. Sometimes you may experience problems that are not yet solved. Well, feel free to contribute 🙂
- “One-way” migration. If your project is rather old, it probably doesn’t use the revocable sessions mechanism. Nevertheless Parse Server supports revocable sessions only. So if you screw up the migration and your users’ apps have knocked to the Parse Server and receive a new session token, they cannot login again to the old parse.com server, even if you turn off the migration process.
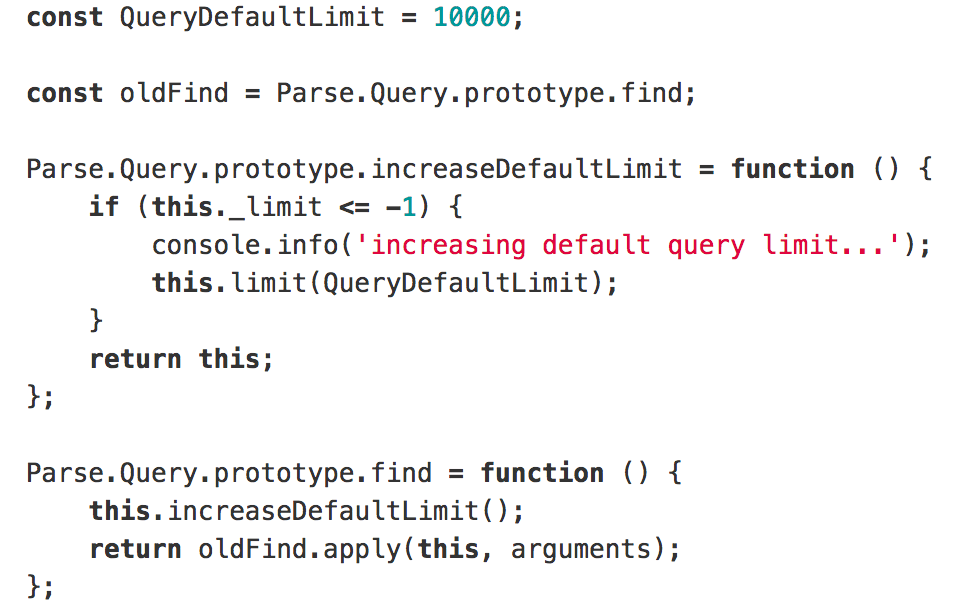
- Default query limit. You remember that the limit was 1000 on parse.com? There’s no such limit anymore on Parse Server! However, if you don’t provide any limit, the default value is 100. This may lead to confusing and hard-to-reproduce bugs, because your previous code was written according to other rules.
- ACL/CLP has different behavior too. Your code might work totally fine on parse.com, but return an “unauthorized” error on Parse Server. There are many ACL-related questions on the repository of Parse Server (like this, this or this), and different versions of Parse Server handle ACL in different ways.
Parse is shutting down on January 30, 2017 and you might need help migrating your apps. We can help with that, let’s talk!
Lessons learned
Deploying Parse Server on our own VPS has been an exciting journey. Our first try with Heroku was quite disappointing: we didn’t have any freedom to configure or optimize the backend. Of course, deploying on the bare Ubuntu server is more fun.
However, setting up convenient infrastructure requires some time and DevOps / backend dev skills. We spent some time creating Parse Server Ansible Playbook, configuring server monitoring, optimizing the database, etc. On the plus side, now we can be sure that our servers are working correctly, and what’s more, we have enough scripts and backups to move to any other Ubuntu server, if Digital Ocean ever shuts down 🙂